
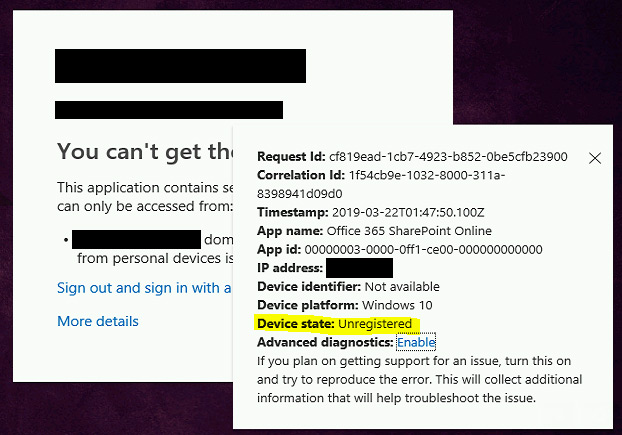
This is a problem that’s been rearing it’s head at my workplace. A user on a Windows 10 workstation tries to visit a web page that has conditional access policies applied. Instead of the page loading, they get the dreaded “You can’t get there from here” message. Clicking more details claims the device they are accessing the page from is “Unregistered”. LIES.
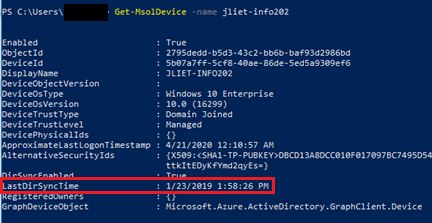
Despite this claim of the device not being registered, I can bring up the details for the workstation in Azure. The date for the LastDirSyncTime looks pretty old, but I’m not quite sure if that indicates a problem or not (screenshot was taken 4/21/2020).
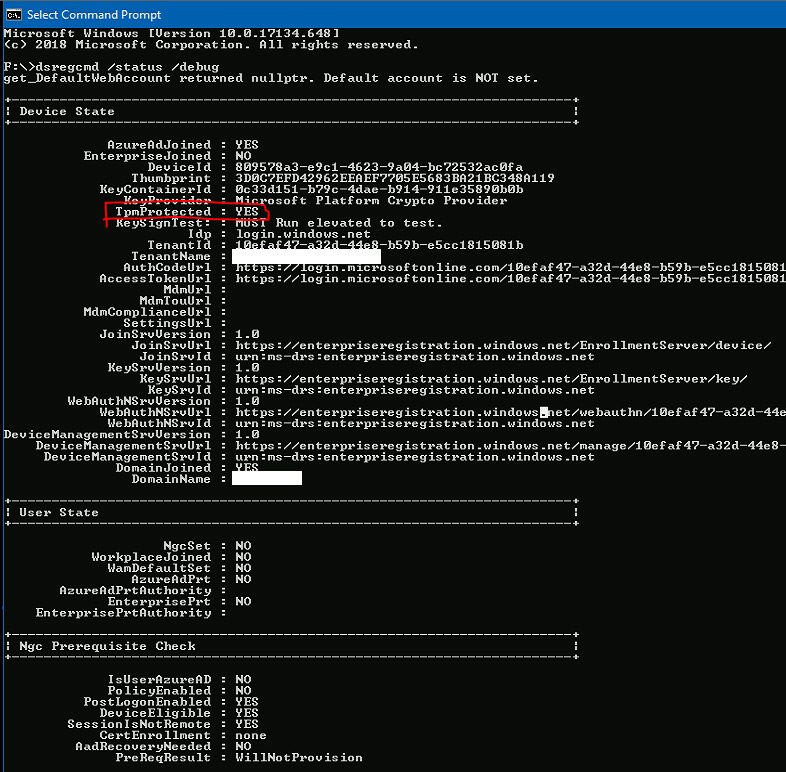
The output from the dsregcmd /status /debug command also shows the device as registered. However, the user state is clearly messed up. (Side note: why is this desktop claiming to be TpmProtected ?) In any case, the device is clearly registered. So now what?
Step 1 – Remove the device from Azure
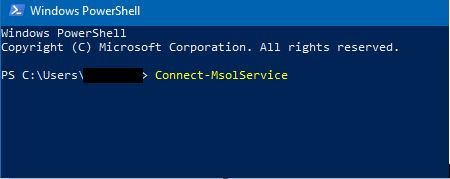
First and foremost, ensure you have the MSOnline Powershell module installed on your workstation, available here https://www.powershellgallery.com/packages/MSOnline
Open PowerShell and run
Connect-MsolService
At the prompt, enter your global admin email address and the password.
After you’ve entered your credentials, proceed to retrieve the workstation from Azure by running the following. This is just to confirm the workstation is actually present in Azure.
Get-MsolDevice -name <computer name>

This output tells me the device is already registered in Azure, but we’re going to force it to re-register. So now run the following command to delete it from Azure.
Get-MsolDevice -name <computer name> | Remove-MsolDevice -Force
After running that command, re-run the first command again to see if it is deleted from Azure
Get-MsolDevice -name <computer name>

I apologize for the blurry screenshot, but all this red text here means it can no longer find the object in Azure. This is what we wanted to do.
Step 2 – Delete Certificates
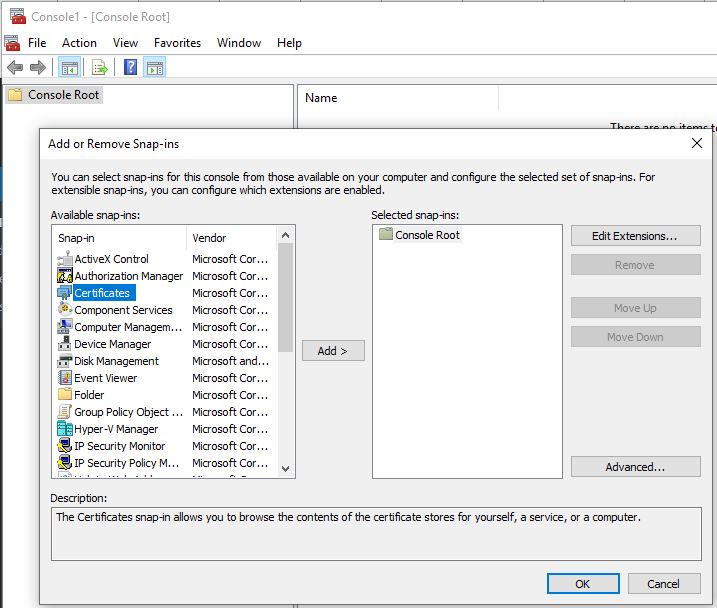
On the affected workstation, open the start menu and type MMC.exe. Right-click on it and run as an administrator.

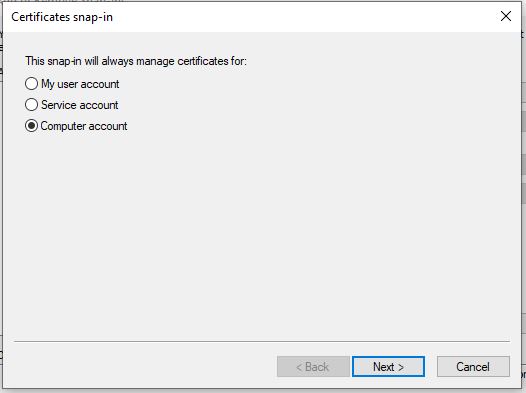
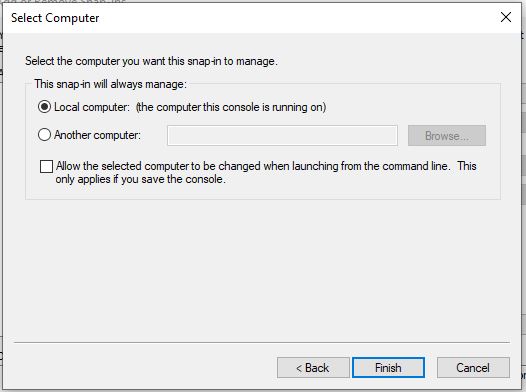
Then add the certificates snap-in by going to File > Add / Remove Snap-in… > Certificates > Add > Computer Account > Next > Finish > OK
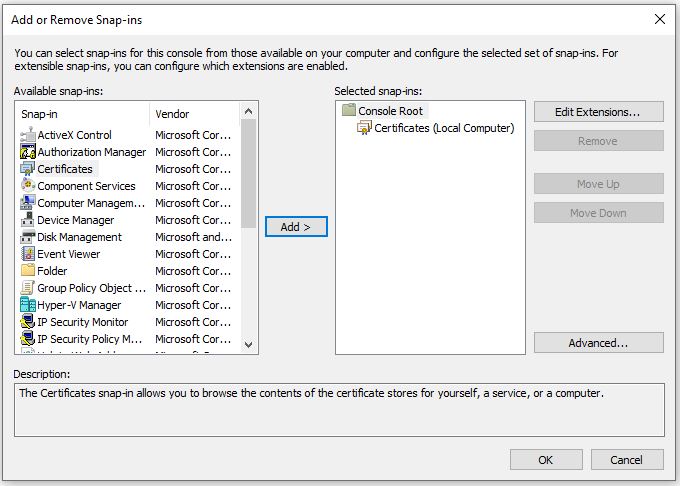
Now expand Certificates (Local Computer) > Personal > Certificates
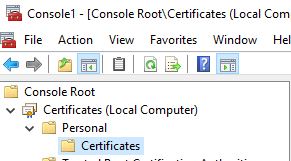
Within here, you should see a few certificates issued by MS-Organization-Access and MS-Organization-P2P-Access. Usually there’s just one of each, but sometimes I’ve seen over a dozen. Regardless, you want to delete all of the certificates that are issued by MS-Organization*.

Upon deletion, I’ve sometimes seen an error pop up on the workstation complaining about an issue with the account being joined to work / school. Ignore this, it’ll be resolved before we’re done.
Step 3 – Re-sync Azure AD Connect
Log into your Azure AD Connect server and open PowerShell. Enter the following command to kick off a re-sync.
Start-ADSyncSyncCycle -PolicyType Delta
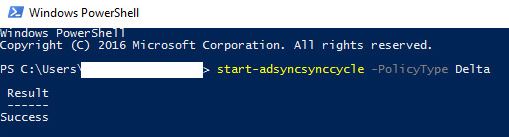
Now despite the fact PowerShell immediately claims “Success”, the sync process actually takes a minute or two to run. Your environment may have longer or shorter sync times depending on organization size. If you’re curious about the status, you can launch the Synchronization Service Manager and take a look. Or just wait a minute or two. The default location of the Synchronization Service Manager is
C:\Program Files\Microsoft Azure AD Sync\UIShell\miisclient.exe
Back on your workstation in your PowerShell window, run the following command to see if the computer has re-synced with Azure
Get-MsolDevice -name <computer name>
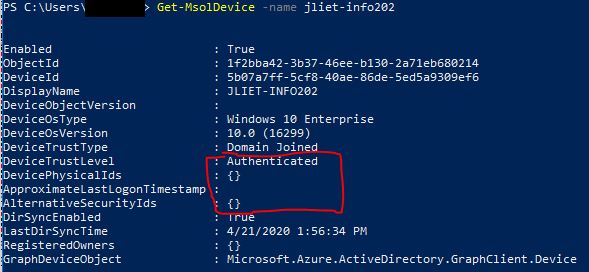
So this output here is showing that it is re-synced but not fully in the correct state. You’ll notice the DeviceTrustLevel is only “Authenticated” and the other fields underneath it are blank. We’re making progress, but we’re not done yet.
If your output instead shows “Device not found” and has all the red text, try repeating the Azure AD Connect sync again and wait a few minutes to see if you can retrieve the object with Get-MsolDevice successfully.
Step 4 – Workplace Join Task
On the affected workstation, open Task Scheduler as an administrator
Expand “Task Scheduler Library > Microsoft > Windows > Workplace Join”
Run the “Automatic-Device-Join” scheduled task
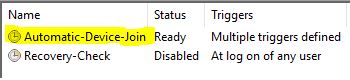
Push F5 to refresh the view until the status goes back to “Ready”. If you still have your certificate MMC window open, you can refresh that view as well to see if two new certificates have appeared

Back in the PowerShell window on your workstation, run the following command again to see the status in Azure
Get-MsolDevice -name <computer name>
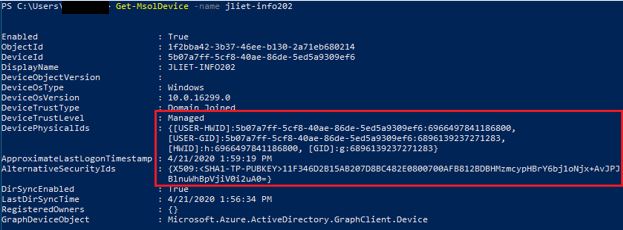
The device trust level should now say “Managed”, and the fields below should now be populated. You should also notice the X509 certificate details in the AlternativeSecurityIds field.
Step 5 – Reboot
At this point, the workstation itself should be re-registered successfully. The user’s currently logged in session however was established prior to the machine being successfully registered, so this needs to be refreshed. You can prove it by running a command prompt as the user and entering
dsregcmd /status
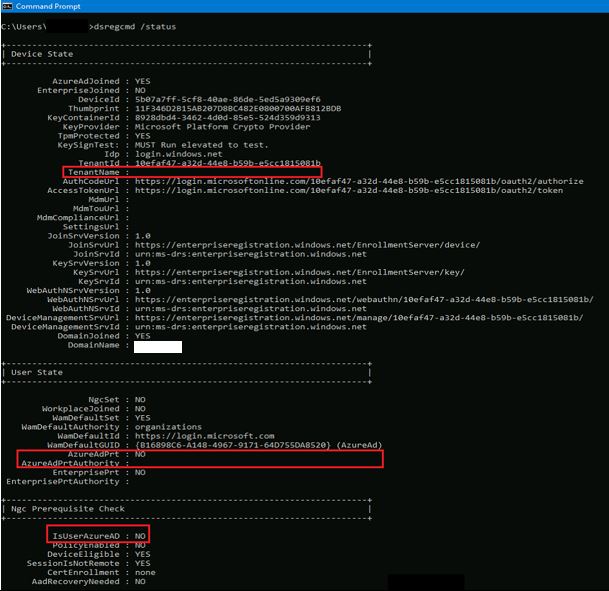
- TenantName : <blank>
- AzureAdPrt : NO
- AzureAdPrtAuthority : <blank>
- IsUserAzureAD : NO
In my example here, the properties outlined in red are still not showing correct information despite the workstation being re-registered successfully
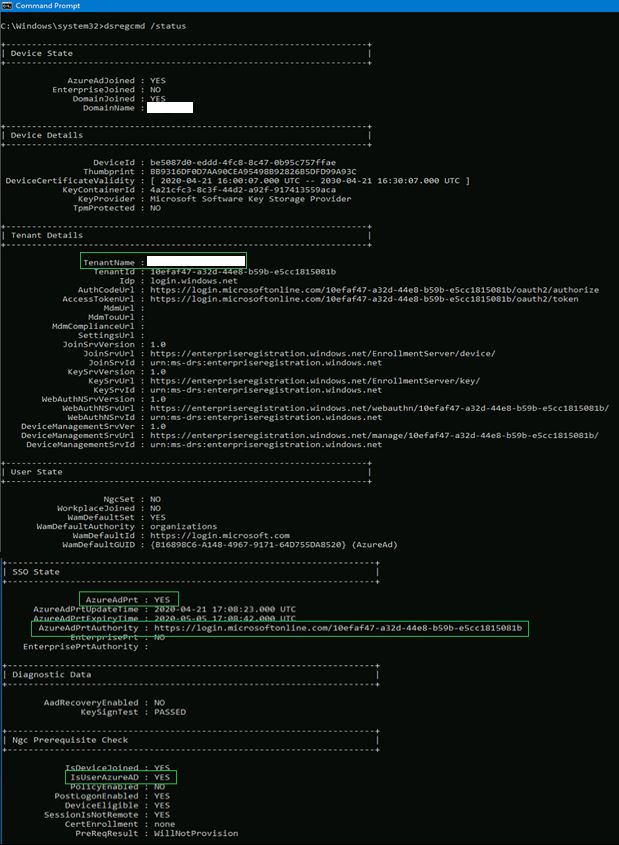
Please note, newer builds of Windows 10 have a slightly rearranged output of this screen, but the properties are all the same. I would guess versions 1809 and newer have the different looking output.
After rebooting the workstation and logging back in as the user, the output looks much better

And to prove I wasn’t a liar about newer builds of Windows 10 having a different looking output, here’s an example with the same fields highlighted.
Bonus Level – PowerShell
If you’d like to get fancy (and honestly save yourself some time), why not do all these steps with PowerShell? Below is a script I use fairly regularly to correct this problem for users. This script does require that you have the MSOnline PowerShell module installed. It will prompt you for the name of the computer you wish to fix, your credentials to connect to Azure, and your Domain Admin credentials. From there, it attempts to run through all the steps outlined above. Obviously substitute the name of your Azure AD Connect server where it is highlighted.
Obviously, run this script at your own risk. I tried to make it fairly straightforward and added comments to describe what each step is doing.
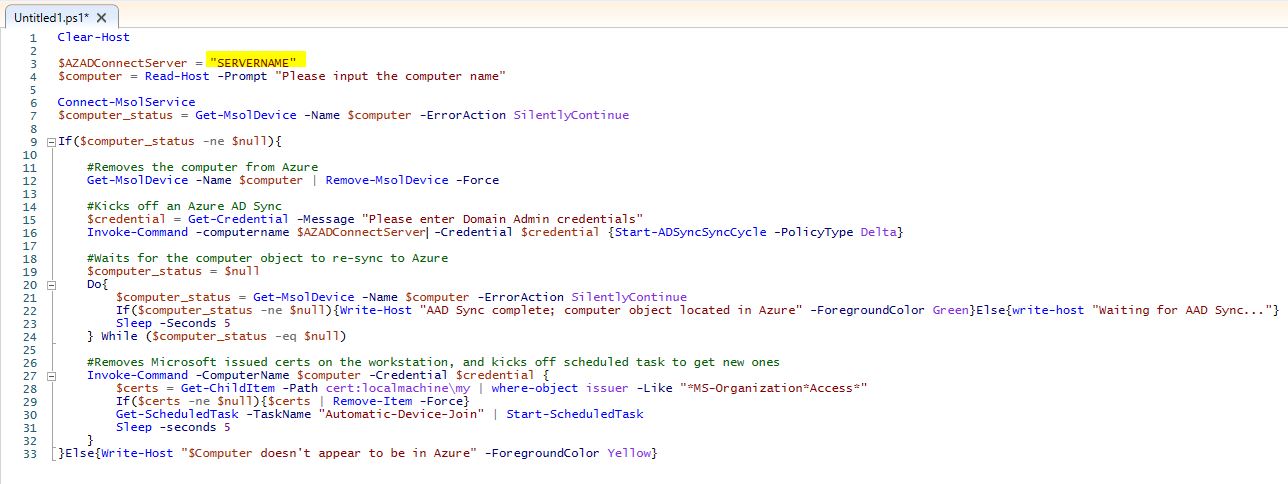
$AZADConnectServer = "SERVERNAME"
$computer = Read-Host -Prompt "Please input the computer name"

Connect-MsolService
$computer_status = Get-MsolDevice -Name $computer -ErrorAction SilentlyContinue
If($computer_status -ne $null){
    #Removes the computer from Azure
    Get-MsolDevice -Name $computer | Remove-MsolDevice -Force

    #Kicks off an Azure AD Sync
    $credential = Get-Credential -Message "Please enter Domain Admin credentials"
    Invoke-Command -computername $AZADConnectServer -Credential $credential {Start-ADSyncSyncCycle -PolicyType Delta}

    #Waits for the computer object to re-sync to Azure
    $computer_status = $null
    Do{
        $computer_status = Get-MsolDevice -Name $computer -ErrorAction SilentlyContinue
        If($computer_status -ne $null){Write-Host "AAD Sync complete; computer object located in Azure" -ForegroundColor Green}Else{write-host "Waiting for AAD Sync…"}
        Sleep -Seconds 5
    } While ($computer_status -eq $null)

    #Removes Microsoft issued certs on the workstation, and kicks off scheduled task to get new ones
    Invoke-Command -ComputerName $computer -Credential $credential {
        $certs = Get-ChildItem -Path cert:localmachine\my | where-object issuer -Like "MS-OrganizationAccess*"
        If($certs -ne $null){$certs | Remove-Item -Force}
        Get-ScheduledTask -TaskName "Automatic-Device-Join" | Start-ScheduledTask
        Sleep -seconds 5
    }
}
Else{Write-Host "$Computer doesn't appear to be in Azure" -ForegroundColor Yellow}