
A Windows 7 user tries to sign into portal.office.com and they see the following pop-up with two or more certificates displayed. You can select any of them and it seems to go through, but why are we getting the pop-up in the first place? Obviously this is not ideal for the user’s experience.

These certificates actually represent various DeviceIDs that are registered in Azure. When a user’s personal certificate store has multiple certificates in it representing multiple registered machines, you will see the prompt asking which certificate you want to use to authenticate. Let’s take a look with PowerShell and see what’s going on.
Powershell Time!
First and foremost we need to get connected.
Connect-MsolServiceOk now let’s get a list of the device IDs that are associated with our user having the prompt
Get-MsolDevice -RegisteredOwnerUpn "firstname.lastname@company.com" | select displayname, deviceid
You will probably recognize that some of these Device IDs match those certificate prompts we were seeing.
Locally Installed Certificates
On the workstation having the problem, sign in as the user. Then open up mmc, add the certificates snap-in, and select the Certificates – Current User snap-in. Drill down to Certificates – Current User > Personal > Certificates. You should see some familiar looking entries
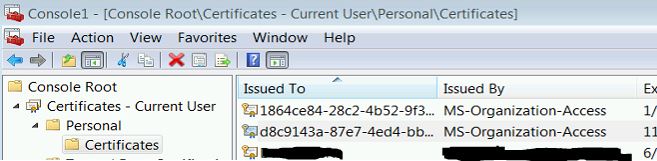
You will see a few certificates issued by MS-Organization-Access. If you look back at our powershell window, only ONE of those certificates matches the associated computer. In this case, the computer is ITSCA-INFO405, but it has a certificate for itself and the ITSCA-AVWS601 system as well. By deleting out this rouge certificate (1864ce84-28c2…) from the local workstation, we should no longer see a prompt when we log into the office portal.
So what’s the deal?
As it turns out, this was related to a GPO setting. Specifically, a setting to roam users’ certificates and keys. This can be found at
User Configuration > Policies > Windows Settings > Security Settings > Public Key Policies/Certificate Services Client – Credential Roaming Settings
Roam the user’s Certificates and Keys
The setting above, when enabled, roams any X.509 certificates located in the user’s personal store. This obviously will include the certificates issued by Microsoft.
Example: When you sit down at “Desktop A” you are issued a certificate. Then when you sit down at “Desktop B” you are issued another certificate, but the certificate from “Desktop A” is also available because it was “roamed” with your profile. This causes the prompt to appear asking which certificate you want to use. Every time you log into another Windows 7 workstation a new certificate is issued and added to the list of certificates that is roamed with your profile.
My solution was to disable this setting.
How do I fix this for PCs that already have multiple certs?
It seems that the only way to really “fix” this issue is to delete all the offending certs, unjoin Azure, and re-join Azure. We can thankfully do most of this automatically. Powershell can easily identify and remove the offending certificates, and it can be run under the regular user’s credentials. You don’t need admin access.
get-childitem -recurse cert:currentuser\my | where-object issuer -like ms-organization-accessThis command will return all the certificates in the current user store with an issuer value that contains “ms-organization-access”. If you want to just delete them all, pipe this to remove-item like so
get-childitem -recurse cert:currentuser\my | where-object issuer -like ms-organization-access | remove-itemIn my case, I couldn’t automatically run powershell scripts on Windows 7 workstations due to that not being enabled across the board in my organization. I got around this by running it from the command line in a one-time logon script like so (please note: you don’t want to run this every time the user logs in. Just have it run once to correct the problem)
powershell -command " & {get-childitem -recurse cert:currentuser\my | where-object issuer -like ms-organization-access | remove-item}"After running the above command, you will need to manually unjoin and rejoin azure with the following two commands, since the computer still thinks we’re joined and won’t automatically request a new certificate. You can place these next lines in the same logon script.
C:\Program Files\Microsoft Workplace Join\AutoWorkplace.exe /leave
C:\Program Files\Microsoft Workplace Join\AutoWorkplace.exe /join
After doing all this, you should hopefully only see ONE new certificate issued by MS-Organization-Access in the Certificates – Current User > Personal > Certificates store.
thanks for your post, you saved my life
In our environment, we have the one ms-organization-access cert showing up on our clients, however non-domain joined devices are still frequently prompted as to whether the cert can be trusted. Any idea of why this prompt would not be a one-time acceptance (at least for the lifetime of the cert)?
Hi,
I followed above instructions and although I could only see one certificate installed on the computer that is for the correct device ID, I still see this certification notification.
This only happen to IE and google chrome works fine. Also this only appeared after I added below URLs to trusted site zone, recommended by Microsoft.
device.login.microsoftonline.com
sts..co.uk
enterpriseregistration.windows.net
login.microsoftonline.com
autologon.microsoftazuread-sso.com
If I remove these settings from GPO, it works fine again.
Is there anything else we can check?